一、环境
1 2
| 系统: Windows 10 专业版 软件: Visual Studio Code 1.23.1
|
二、安装软件
安装Visual Studio Code
VS Code直接在官网下载,安装即可。
安装编译器
目前Windows下,VS Code调试仅支持Cygwin和MinGW。我们这里使用mingw-64。首先我们需要去官网下载mingw-64。这里我们下载离线安装包,下载过程如下图所示:
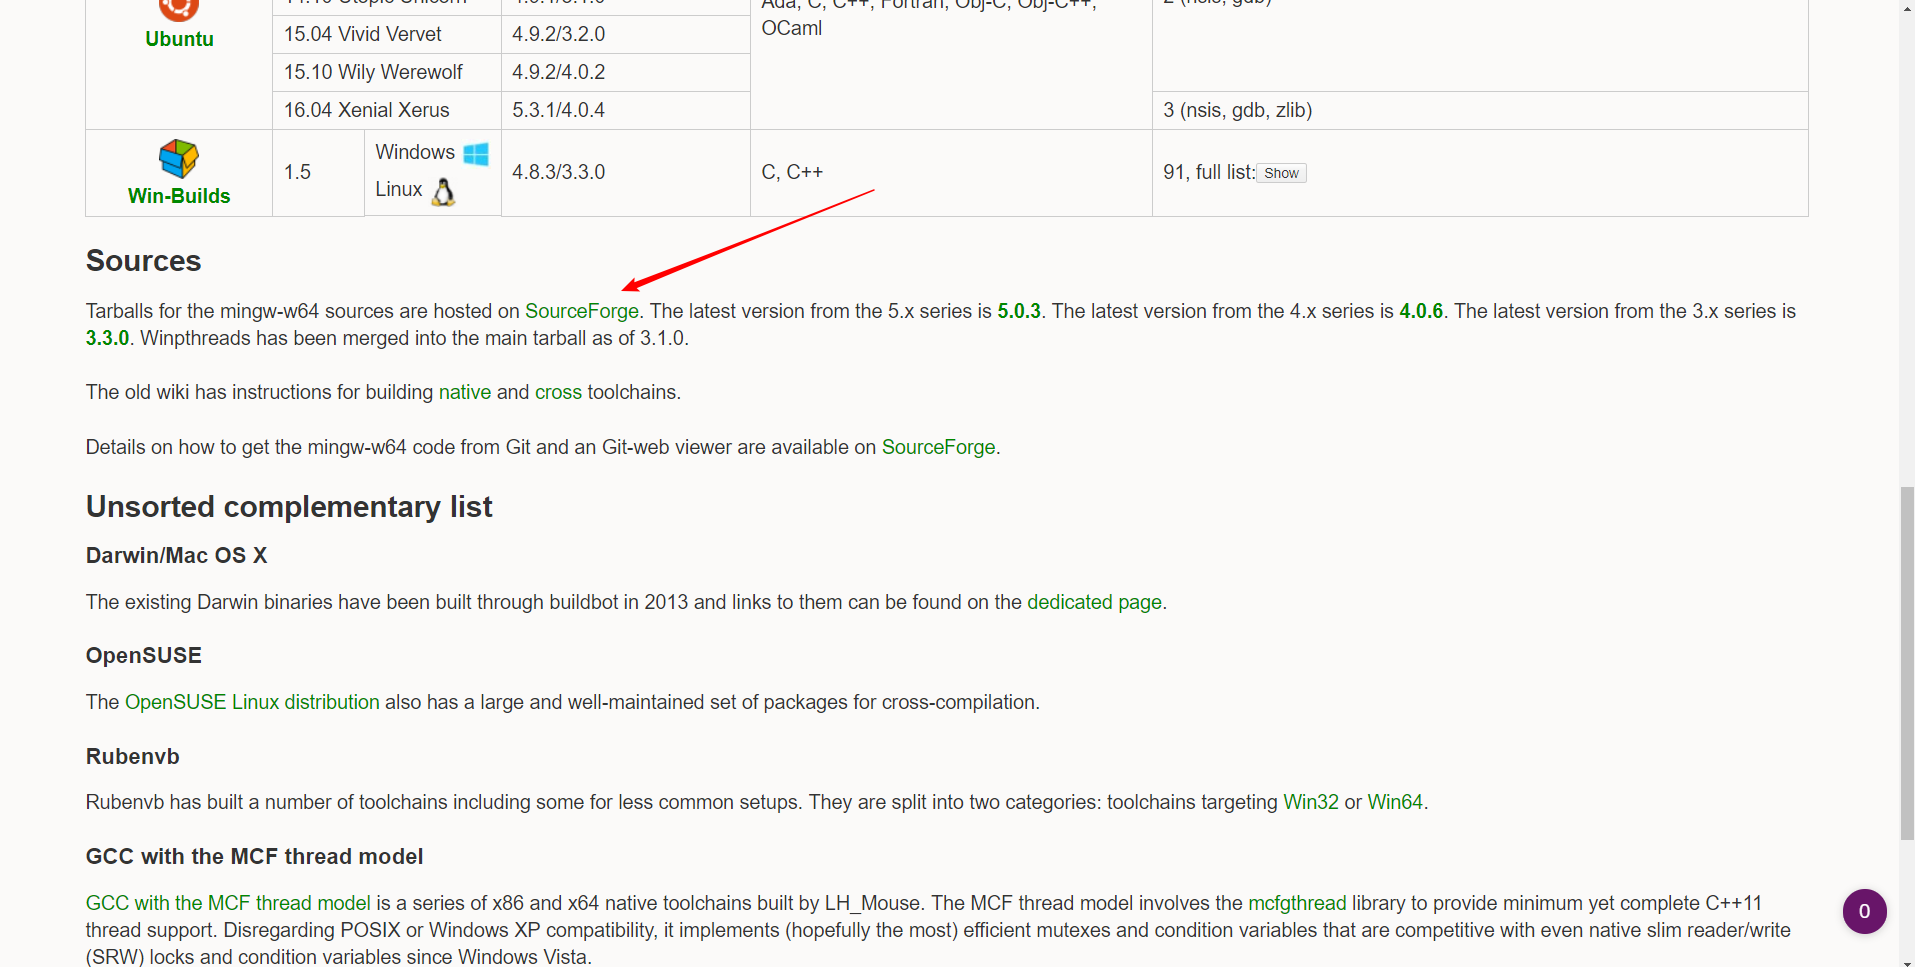
下载完成后,我们需要把安装包解压到一个目录下,这里我把它解压到C:\Program Files (x86)\mingw64下,然后记下这个目录的路径。
(如何选择适合自己的安装包,参考《⑨也懂系列:MinGW-w64安装教程》著名C/C++编译器GCC的Windows版本)
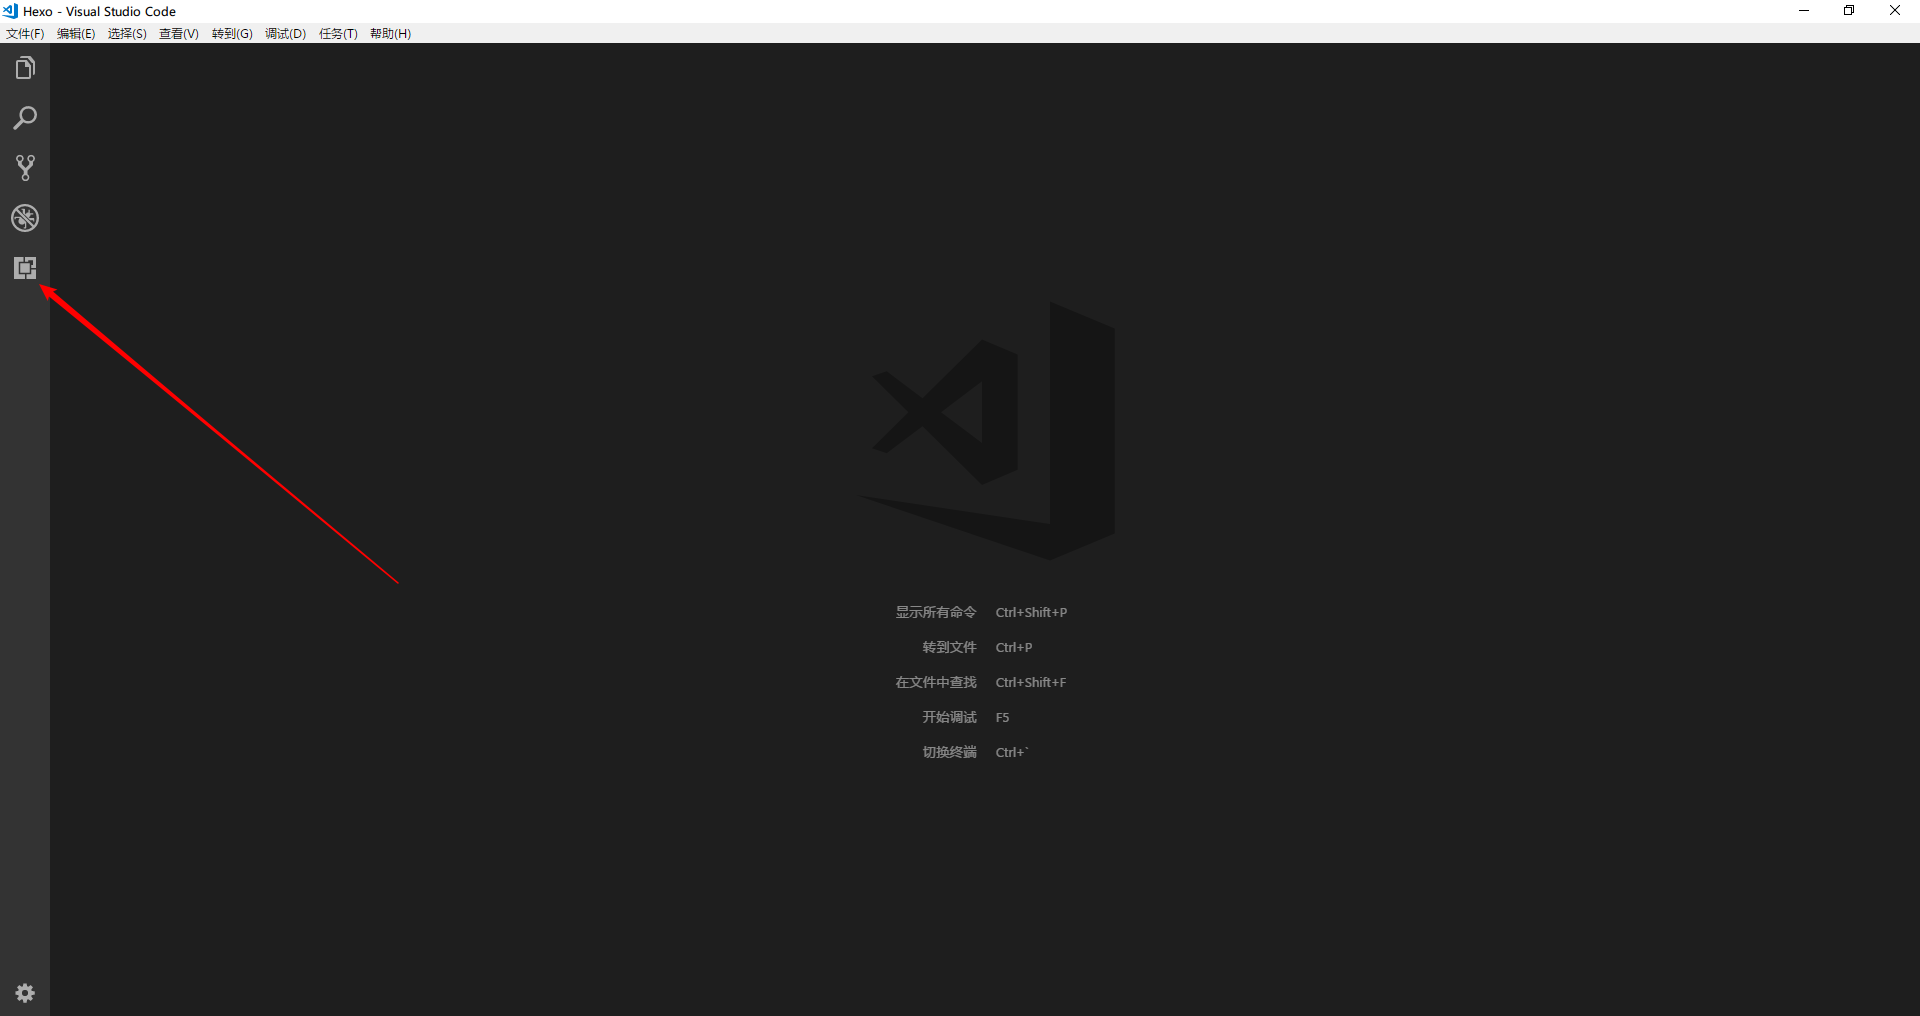
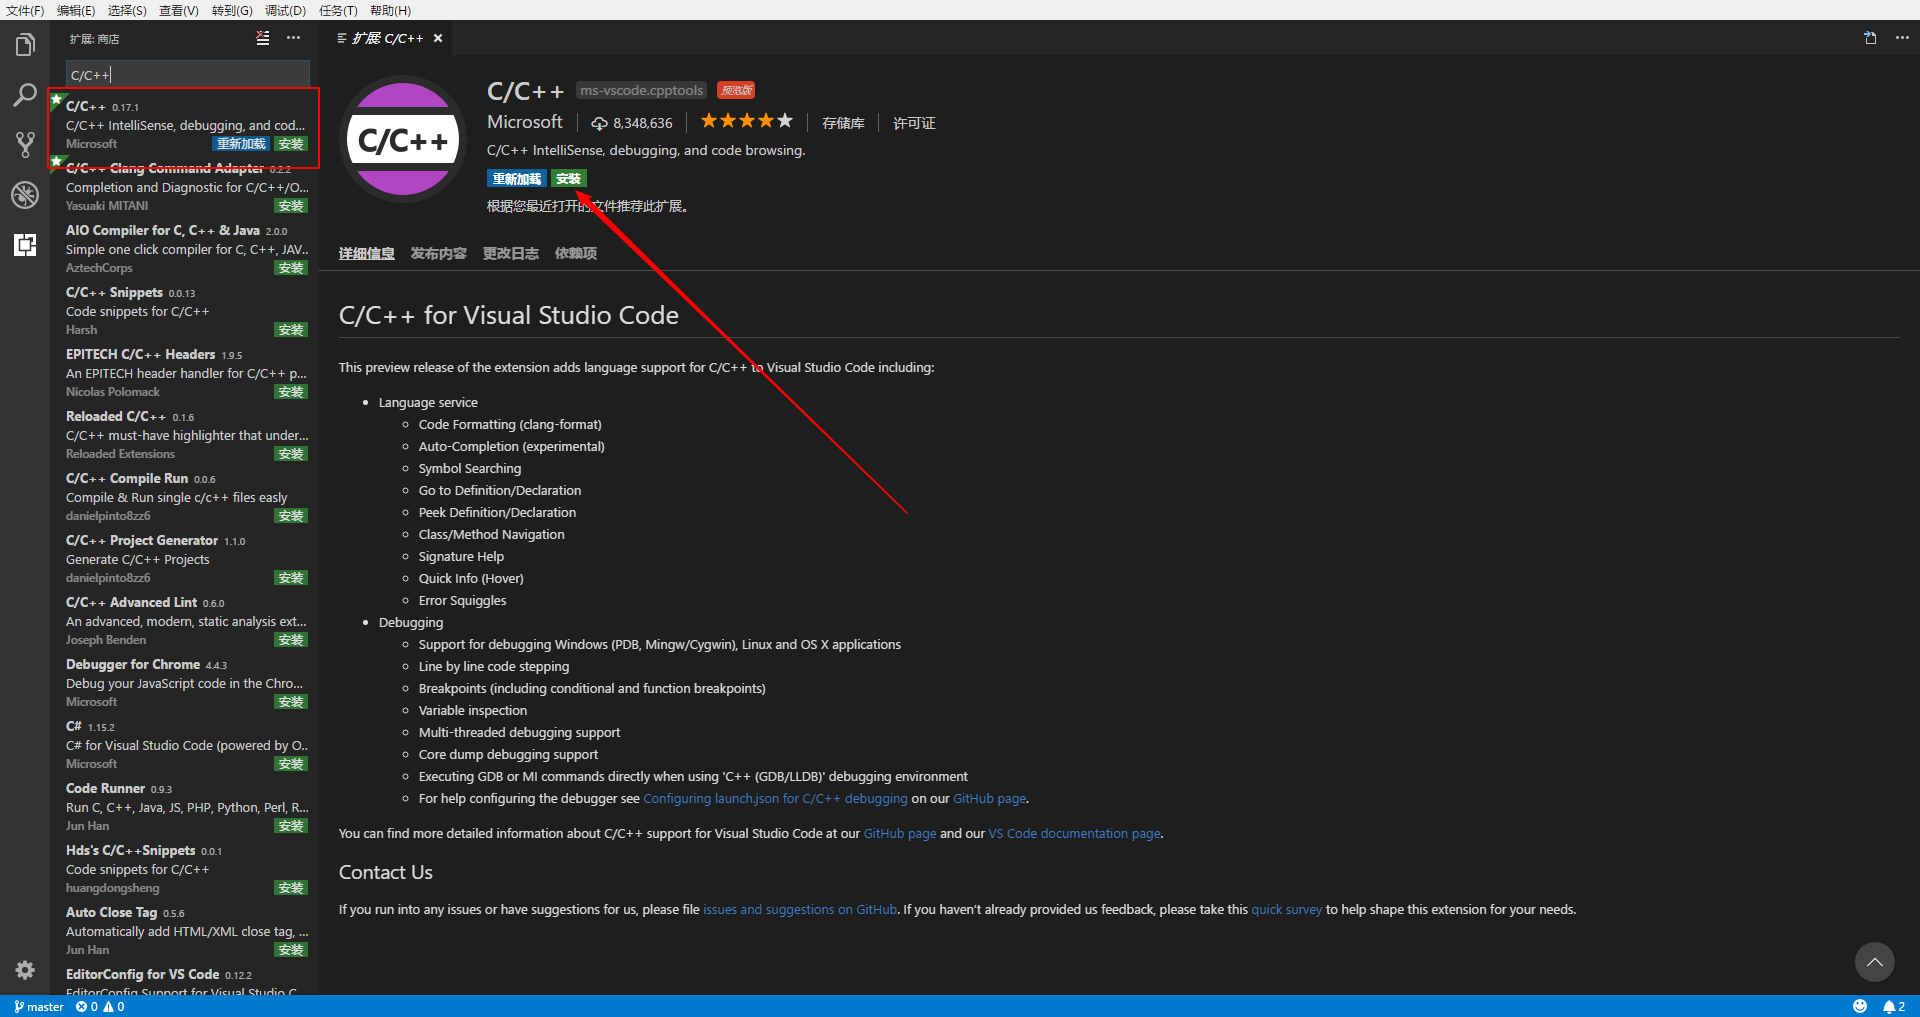
安装C/C++插件
打开VS Code,然后如下图所示安装插件:
三、添加环境变量
安装完mingw-64,我们需要把它添加到系统环境变量中。
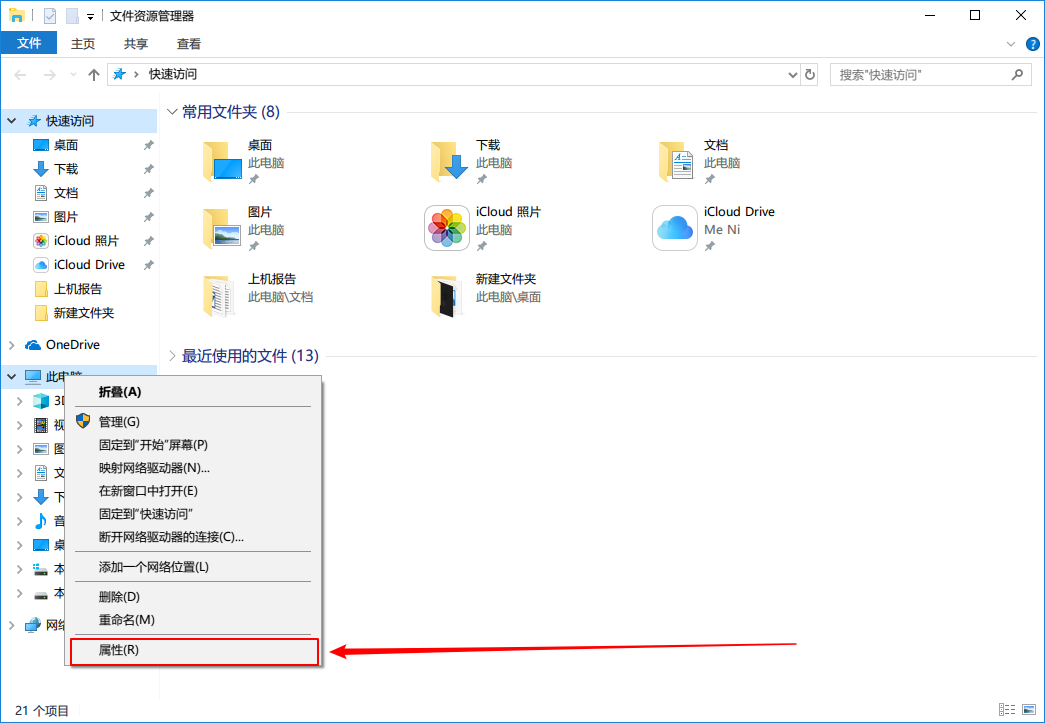
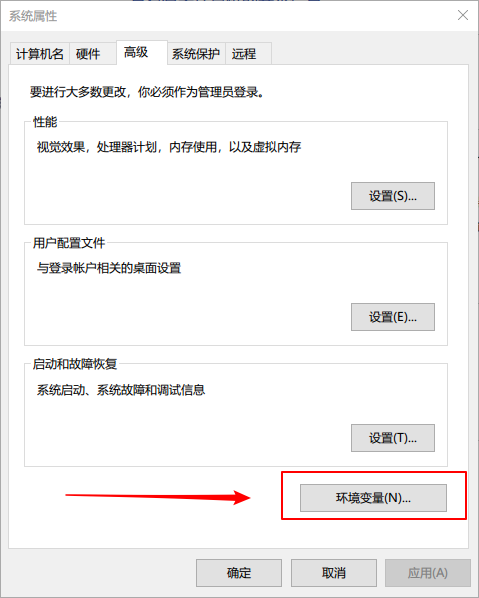
进入文件资源管理器(Win+E),右击左边栏的此电脑,点击属性>高级系统设置>高级>环境变量。
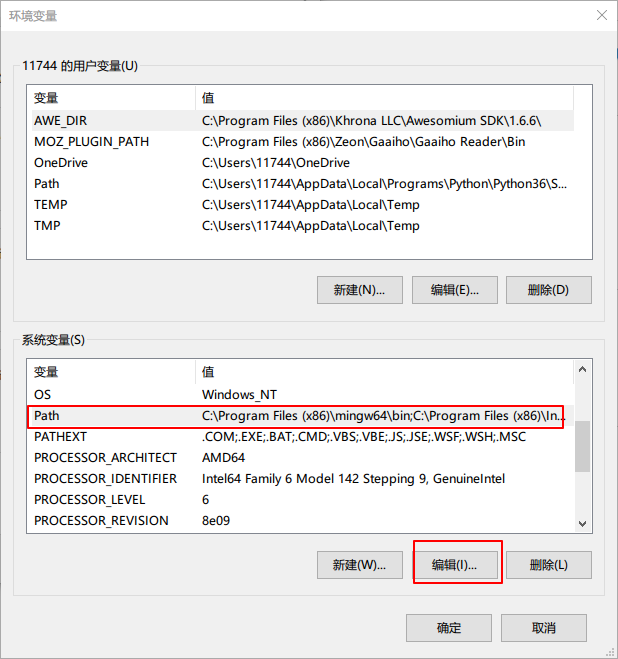
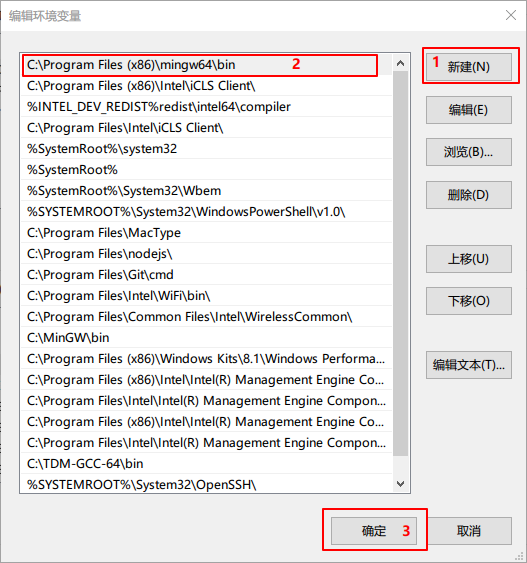
然后选择系统变量中的Path,点击编辑>新建,然后进入mingw-64的安装目录,进入bin文件夹,复制目录路径,粘贴到新建变量,确定。

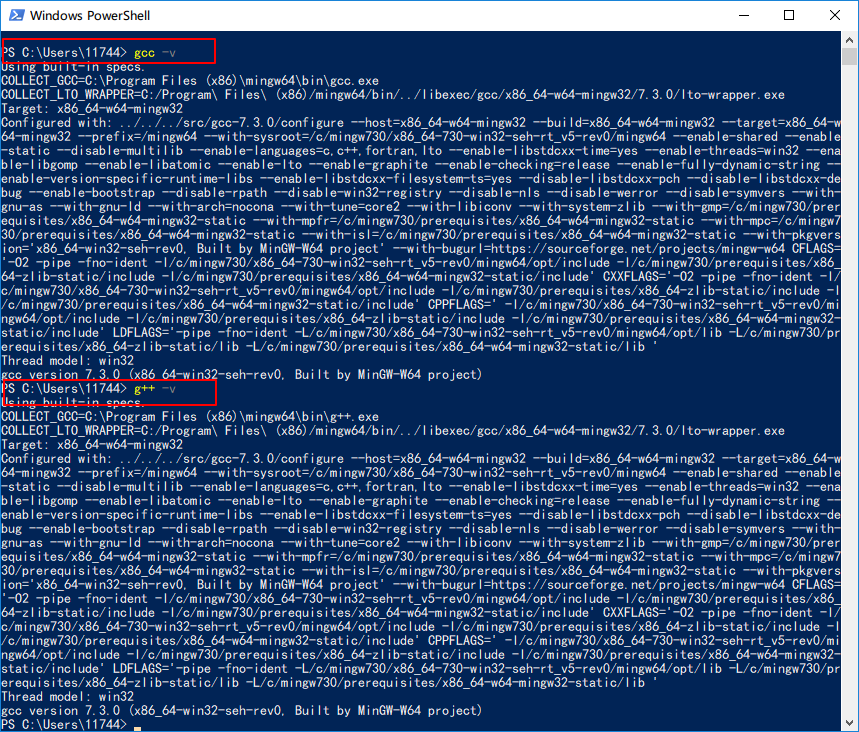
添加完环境变量后,我们可以按下Win+X选择Windows PowerShell,然后依次输入gcc -v、g++ -v、gdb来查看是否添加成功,如果出现如下画面,说明添加成功。
添加环境变量成功后,需要重启VS Code。
四、配置编译和调试环境
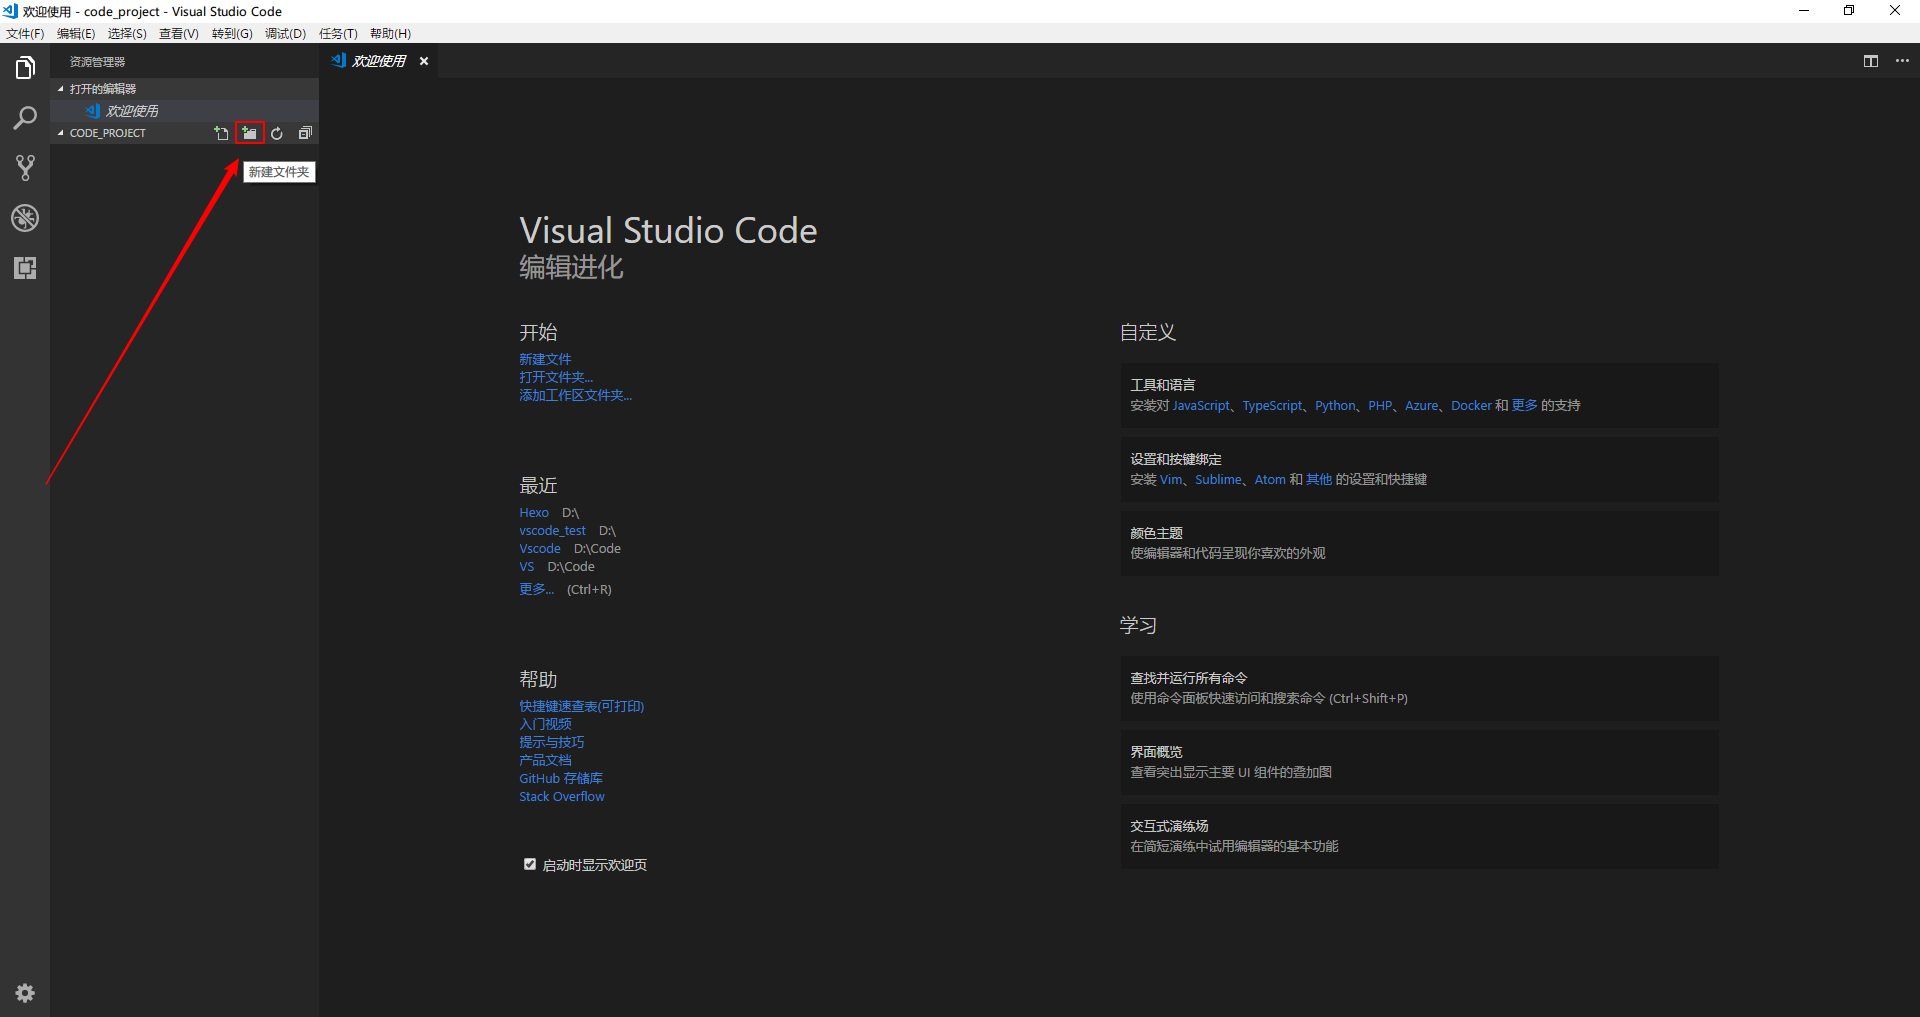
首先,我们需要创建一个项目文件夹,这里我在D盘创建了一个code_project的文件夹,然后用VS Code打开这个文件夹。
然后,我们要在code_project下新建一个.vscode文件夹,并且在.vscode文件夹下新建三个文件:
tasks.json、launch.json、c_cpp_properties.json。
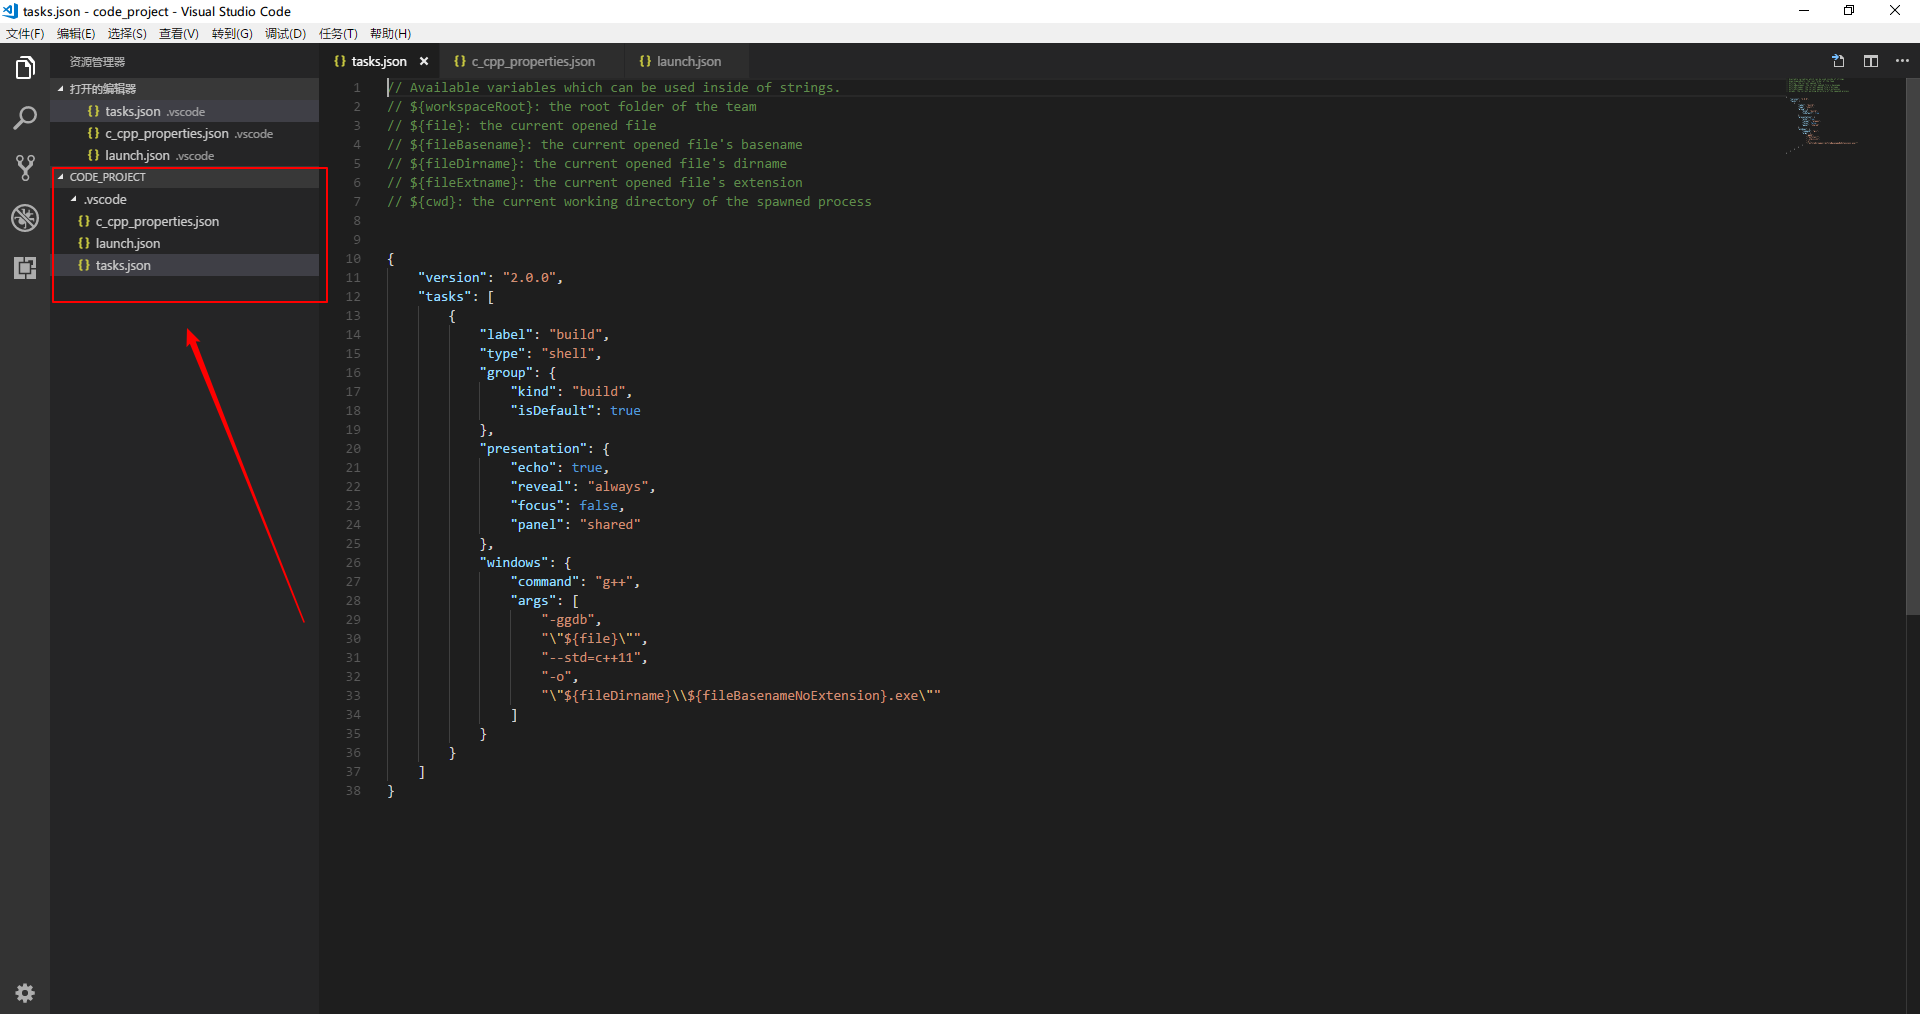
这三个文件的内容分别为:
1 2 3 4 5 6 7 8 9 10 11 12 13 14 15 16 17 18 19 20 21 22 23 24 25 26 27 28 29 30 31 32 33 34 35 36 37 38
| // Available variables which can be used inside of strings. // ${workspaceRoot}: the root folder of the team // ${file}: the current opened file // ${fileBasename}: the current opened file's basename // ${fileDirname}: the current opened file's dirname // ${fileExtname}: the current opened file's extension // ${cwd}: the current working directory of the spawned process { "version": "2.0.0", "tasks": [ { "label": "build", "type": "shell", "group": { "kind": "build", "isDefault": true }, "presentation": { "echo": true, "reveal": "always", "focus": false, "panel": "shared" }, "windows": { "command": "g++", "args": [ "-ggdb", "\"${file}\"", "--std=c++11", "-o", "\"${fileDirname}\\${fileBasenameNoExtension}.exe\"" ] } } ] }
|
1 2 3 4 5 6 7 8 9 10 11 12 13 14 15 16 17 18 19 20 21 22 23 24 25 26 27 28 29 30 31 32 33 34
| // Available variables which can be used inside of strings. // ${workspaceRoot}: the root folder of the team // ${file}: the current opened file // ${fileBasename}: the current opened file's basename // ${fileDirname}: the current opened file's dirname // ${fileExtname}: the current opened file's extension // ${cwd}: the current working directory of the spawned process { "version": "0.2.0", "configurations": [ { "name": "(gdb) Launch", "preLaunchTask": "build", "type": "cppdbg", "request": "launch", "program": "${fileDirname}/${fileBasenameNoExtension}.exe", "args": [], "stopAtEntry": false, "cwd": "${workspaceFolder}", "environment": [], "externalConsole": true, "MIMode": "gdb", "miDebuggerPath": "C:/Program Files (x86)/mingw64/bin/gdb.exe", //GDB的路径,注意替换成自己的路径 "setupCommands": [ { "description": "Enable pretty-printing for gdb", "text": "-enable-pretty-printing", "ignoreFailures": true } ] } ] }
|
注意:此处的GDB路径要替换成自己的编译器安装路径
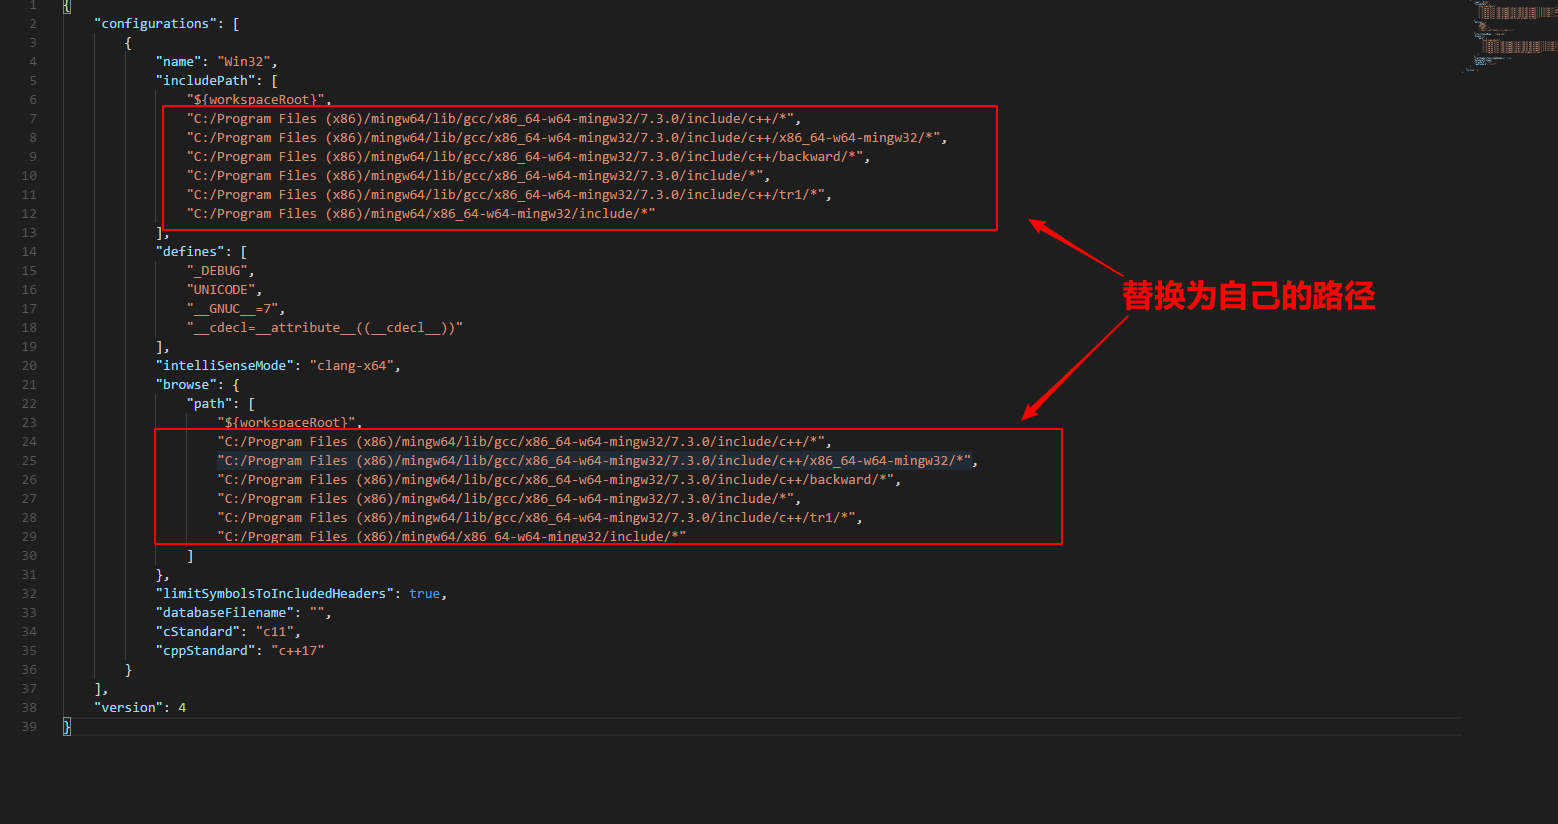
1 2 3 4 5 6 7 8 9 10 11 12 13 14 15 16 17 18 19 20 21 22 23 24 25 26 27 28 29 30 31 32 33 34 35 36 37 38 39
| { "configurations": [ { "name": "Win32", "includePath": [ "${workspaceRoot}", "C:/Program Files (x86)/mingw64/lib/gcc/x86_64-w64-mingw32/7.3.0/include/c++/*", "C:/Program Files (x86)/mingw64/lib/gcc/x86_64-w64-mingw32/7.3.0/include/c++/x86_64-w64-mingw32/*", "C:/Program Files (x86)/mingw64/lib/gcc/x86_64-w64-mingw32/7.3.0/include/c++/backward/*", "C:/Program Files (x86)/mingw64/lib/gcc/x86_64-w64-mingw32/7.3.0/include/*", "C:/Program Files (x86)/mingw64/lib/gcc/x86_64-w64-mingw32/7.3.0/include/c++/tr1/*", "C:/Program Files (x86)/mingw64/x86_64-w64-mingw32/include/*" ], "defines": [ "_DEBUG", "UNICODE", "__GNUC__=7", "__cdecl=__attribute__((__cdecl__))" ], "intelliSenseMode": "clang-x64", "browse": { "path": [ "${workspaceRoot}", "C:/Program Files (x86)/mingw64/lib/gcc/x86_64-w64-mingw32/7.3.0/include/c++/*", "C:/Program Files (x86)/mingw64/lib/gcc/x86_64-w64-mingw32/7.3.0/include/c++/x86_64-w64-mingw32/*", "C:/Program Files (x86)/mingw64/lib/gcc/x86_64-w64-mingw32/7.3.0/include/c++/backward/*", "C:/Program Files (x86)/mingw64/lib/gcc/x86_64-w64-mingw32/7.3.0/include/*", "C:/Program Files (x86)/mingw64/lib/gcc/x86_64-w64-mingw32/7.3.0/include/c++/tr1/*", "C:/Program Files (x86)/mingw64/x86_64-w64-mingw32/include/*" ] }, "limitSymbolsToIncludedHeaders": true, "databaseFilename": "", "cStandard": "c11", "cppStandard": "c++17" } ], "version": 4 }
|
注意:这里的一大堆路径也要替换成自己的。
五、测试
我们在code_project文件夹下新建一个hello.cpp文件,输入以下代码:
1 2 3 4 5 6
| #include <iostream> int main(void) { std::cout << "Hello World" << std::endl; return 0; }
|
我们点击左边栏,设置断点,按F5进行调试运行。如果出现下面的情况:
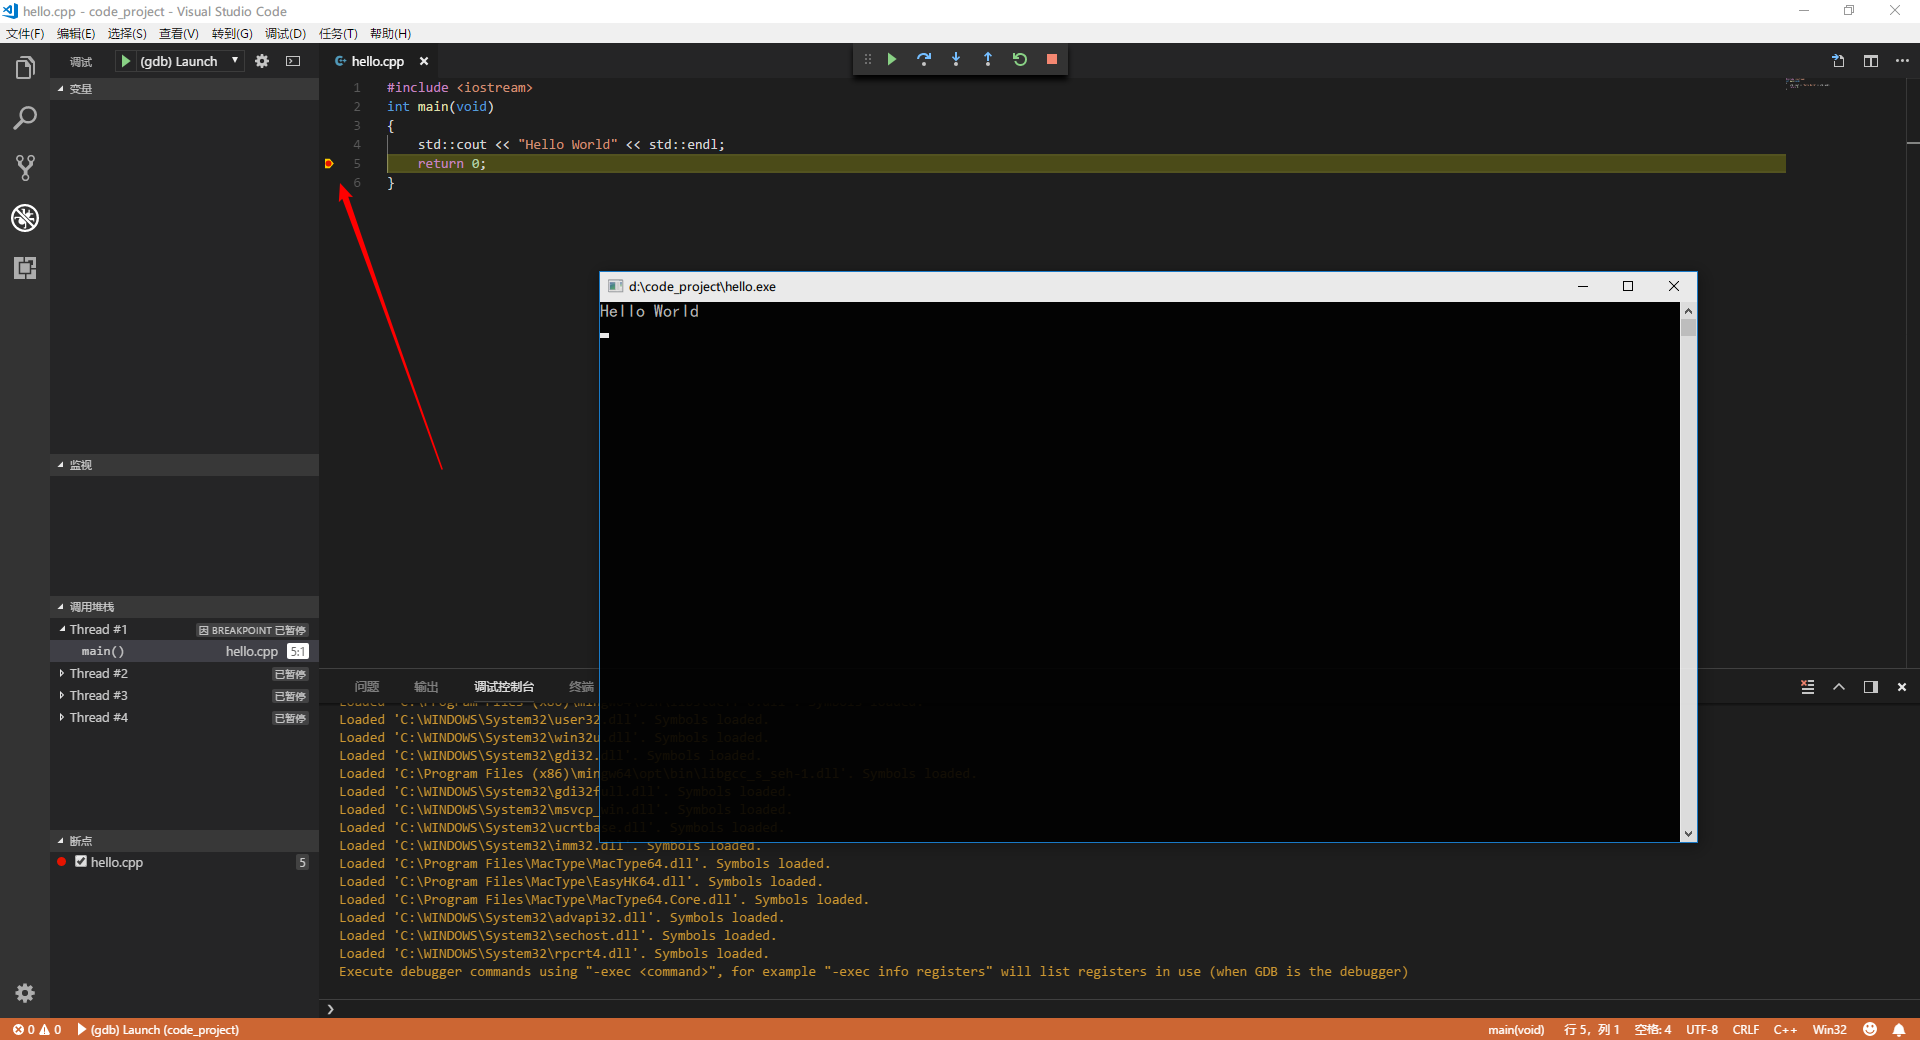
说明C/C++的环境就配置完成了,享受编程吧!
六、参考资料:
My vscode cannot recognize “cout” “endl” etc… (MinGW) #757
【VSCode】Windows下VSCode编译调试c/c++【更新 2018.03.27】
vscode的c、c++环境配置 windows篇
Visual Studio Code (vscode)编译C++